Color Separation: The Basics
January 31, 2019

There are many different methods of screen printing. The vast majority of printing we do is spot color using plastisol inks. A multi color print must be separated into colors. A screen is then prepared for each color. Here is a quick tutorial on how we create these separations at MarkIt merchandise.
We start with an image of what you want your shirt to look like. Using vectored art we create a proof for the customers approval.

Once this is approved, we take the vectored art and format it to make sure there are no outlines, hidden objects, or masks that will inadvertently change the separations.

Then we add registration marks to make the image easier to align on the light box and on press, making sure to align the middle mark with where we want the center of the image to appear.

Next, we create a copy of the artwork for every color in the image, in this case 3, and label them for which color they will be. We leave the original as is so it can be used to make more separations in the future if we need things such as an underlay or highlight white.

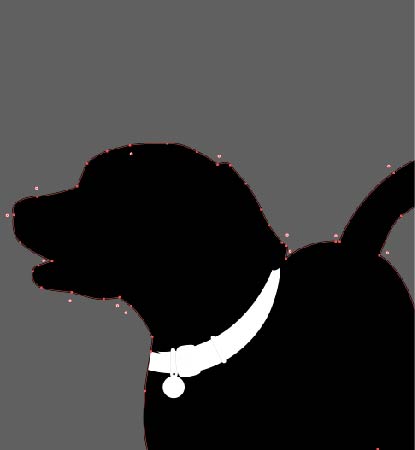
Starting with the white separation, we select all the white portions and convert them to a solid black. We convert them to black because there are vibrant colors in this specific design that will dull if they are printed directly onto the garment. This means we must create an underlay with the white screen in which the black represents. The underlay will act like a primer paint on a wall helping the vibrancy and accuracy of the colors on top of it while cutting down on the amount of ink needed for full opacity.
When creating an underlay we add a little bit of trapping. Trapping is done by making the underlay image slightly smaller and the overlay color slightly larger by adding a white stroke to the underlay and a black stroke to the overlays. This is done to compensate for the white ink spreading out on the garment and to aid the printers in aligning the screens on press.

We then move on to next color separation and make the color labeled on that copy solid black and all other colors white. We add trapping where applicable and repeat this process until all separations are complete and we can print the film. We then use the film to burn the screens and then the printing process begins!

If you have any questions please be sure contact us!